Saturday, April 30, 2011

Vanilla Bean Dream Cream Pie

I had never baked with vanilla beans until about a month ago, and believe me they are so worth the price.  Vanilla beans have such an intense vanilla scent and flavor, and I love the gorgeous flecks they add to baked goods.

So when Dessert Wars announced their April theme was vanilla I was all in.  There was a catch though, you needed to use vanilla in three different ways in one dessert.  I had quite a few ideas,  most of which my husband told me were lame, until I came up with this one.

A vanilla bean wafer crust, a creamy vanilla bean and rum filling, topped with vanilla bean pralines.  Have I got your attention now?  If you love vanilla this is the dessert for you.  Mmmmm.  Cream pies are so awesome, and this one is loaded with rich vanilla flavor. 


Vanilla Wafers
adapted from Frugal Antics of a Harried Homemaker


1 stick butter, softened
1/2 cup sugar
1 large egg
1 vanilla bean, split length-wise and scraped
1 1/4 cup all purpose flour
1 tsp baking powder
Using a stand mixer fitted with the paddle attachment, cream the butter and sugar until light and fluffy . Add the egg and vanilla and beat until combined.  Whisk together the flour and powder, beat into butter mixture until just combined.  
Roll into a log, approximately 12 inches long, the radius should be about 2-3 inches.  Wrap in plastic wrap and freeze for at least 4 hours, preferably overnight.  
Preheat oven to 350 degrees.  Take dough out of the freezer about 1/2 hour before slicing.  Cut into slices about 1/2 inch thick.  Place on baking sheet lined with parchment paper, about 1 inch apart.  Bake for 10 minutes or until golden brown.  Let cool on baking sheet for about 5 minutes, than remove to wire rack to cool completely.

Vanilla Wafer Crust
1 1/4 cup crushed vanilla wafers
1/4 cup melted butter
2 tablespoons sugar
Preheat oven to 350 degrees F.  Mix all the ingredients together and press into a 9-inch pie pan.  Bake for 8-10 minutes.  Cool completely before filling.


Vanilla Bean Pralines
adapted from Allrecipes

1 1/2 cups toasted pecans
1 1/2 cups white sugar
3/8 cup butter
3/4 cup brown sugar
1/2 cup milk
1/2 vanilla bean, split length-wise and scraped

Line a baking sheet with aluminum foil.
In large saucepan over medium heat, combine pecans, sugar, butter, brown sugar, milk and vanilla. Heat to between 234 and 240 degrees F (112 to 116 degrees C), or until a small amount of syrup dropped into cold water forms a soft ball that flattens when removed from the water and placed on a flat surface.
Drop by spoonfuls onto prepared baking sheet. Let cool completely.  Chop coarsely to use as pie topping.


Rum Vanilla Cream Pie Filling
Adapted from Martha Stewart 

1 cup granulated sugar
1/4 cup cornstarch
1/4 teaspoon salt
2 1/2 cups whole milk
1 1/2 vanilla beans, split and scraped, pods reserved
4 large egg yolks
1/4 cup plus 1 tablespoon (2 1/2 ounces) golden rum
2 ounces (4 tablespoons) unsalted butter, softened
1/2 cup heavy cream
Combine granulated sugar, cornstarch, and salt in a medium saucepan. Whisk in milk and vanilla seeds, and cook over medium-high heat, stirring constantly, until bubbling and thick, about 7 minutes (about 2 minutes after it comes to a boil).
Whisk yolks in a medium bowl until combined. Pour in milk mixture in a slow, steady stream, whisking until completely incorporated. Return the mixture to saucepan, and cook over medium heat, stirring constantly, until it returns to a boil, 1 to 2 minutes.
Remove from heat, and stir in 1/4 cup rum. Add butter, 1 tablespoon at a time, whisking until butter melts before adding next piece. Let cool in saucepan on a wire rack, whisking occasionally, for about 10 minutes.
Pour custard into a large bowl . Press plastic wrap directly on surface of custard. Refrigerate until custard filling is chilled and firm, at least 4 hours (or overnight).

Meanwhile, place cream and vanilla pods in a bowl. Cover, and refrigerate for at least 4 hours (or overnight).  Remove the vanilla pods and beat the cream into stiff peaks.  Stir the custard, then carefully fold the whipped cream into the custard.  Spoon into the crust and topped with chopped pralines.  Chill until firm, at least one hour.

Thursday, April 28, 2011

Meyer Lemon Crepe Cake

Yum.  This is probably one of my favorite things that I've made.  I recently blogged about my love of Meyer lemons, and when my dear friend invited us to an Easter BBQ I wanted to make a light and lemony dessert to share.  Often when I make a dessert for a dinner party it ends up being heavy and a bit of a meal on it's own.  If you're having it right after you've eaten dinner you might not enjoy it as much as if you had it on an empty stomach.  So I wanted something that wouldn't be too heavy and overpowering.

This "cake" was perfect.  Thin layers of lightly sweet crepes separated with heavenly Meyer lemon curd mousse.  I seriously wanted to go home and make another one but I'm out of lemons.  Making the crepes was a bit of a hassle, the first five or so I couldn't get to flip quite right and a lot of them ended up being different sizes.  By the end I declared myself a crepe chef extraordinaire, hah.  I skipped Martha's candied lemons and just placed a few lemons on top of whipped cream for garnish.

Photo by Jamie Lacey Photography


Meyer Lemon Crepe Cake
by Martha Stewart

3/4 cup all-purpose flour
1/2 cup sugar
1/4 teaspoon salt
1 1/4 cups whole milk, room temperature
3 large eggs, room temperature
1/2 tablespoon pure vanilla extract
6 tablespoons cold unsalted butter, melted, plus more, melted, for pan
Meyer Lemon Curd Mousse (recipe below)
1/4 cup heavy cream, whipped

Meyer Lemon Curd Mousse

1 teaspoon unflavored gelatin (from one 1/4-ounce envelope)
1 tablespoon cold water
4 large eggs plus 6 large yolks
1 cup sugar
1 tablespoon plus 2 teaspoons finely grated Meyer lemon zest (from 2 lemons), plus 3/4 cup fresh Meyer lemon juice (from 5 to 6 lemons)
6 tablespoons cold unsalted butter, cut into small pieces
1 cup heavy cream, whipped

Sprinkle gelatin over water; let stand until softened, about 5 minutes.
Whisk together eggs and yolks in a heavy small saucepan. Whisk in sugar, lemon zest, and lemon juice. Cook, whisking constantly, over medium-low heat, until mixture is thick enough to coat the back of a wooden spoon, 8 to 10 minutes.
Remove pan from heat; add gelatin, stirring constantly, until gelatin dissolves and mixture is slightly cool. Add butter, a few pieces at a time, stirring after each addition, until smooth.
Strain through a fine sieve into a bowl, pressing with a rubber spatula to remove as much curd as possible; discard any undissolved bits of gelatin and egg. Press a piece of plastic wrap directly onto surface of curd to prevent a skin from forming, and refrigerate until set, at least 2 hours or overnight. Stir curd, and gently fold in whipped cream. Refrigerate for 1 hour. Stir before using.

Making the Crepes and Assembling the Cake

Whisk together flour, sugar, and salt. Whisk together milk, eggs, and vanilla. Gradually pour milk mixture into flour mixture, whisking until smooth. Whisk in butter. Pour through a fine sieve into an airtight container; discard lumps. Refrigerate at least 2 hours or overnight.
Lightly coat a 6-inch crepe pan or nonstick skillet with butter. Heat over medium heat until just starting to smoke. Remove from heat; pour about 2 tablespoons batter into center. Swirl to cover bottom. Reduce heat to medium-low; return pan to heat. Cook until edges are golden and center is dry, about 30 seconds per side.
Slide crepe onto an overturned plate. Repeat with remaining batter, coating pan with butter as needed, and stacking crepes. Let cool.

Place 1 crepe on a flat serving dish. Spread about 1/4 cup lemon curd mousse onto crepe. Top with 1 crepe. Continue layering crepes and mousse. (Use 15 crepes, ending with a crepe on top.) Refrigerate until firm, about 1 hour.  Top with whipped cream and lemon slices to garnish.

Linked to:
Sweet Tooth Friday
Sweets for a Saturday
Melt in Your Mouth Monday

Tuesday, April 26, 2011

Meyer Lemon Cupcakes

When we first moved to California I wanted nothing more than a house that had a nice yard with a palm tree and a citrus tree in it.  Several years later I have a town house with two enormous queen palms and a sweet little Meyer lemon tree that we just planted and hasn't bore any fruit yet.

My husband is a total plant/garden guy and he insisted we get a Meyer lemon tree.  The fruits are sweeter than normal lemons, making them ideal for baking since they don't require so much sugar and still pack some serious lemon flavor.  If you're wondering where to find Meyers you might luck out, sometimes our chain grocery store carries them, but a farmer's market is more likely to have some.

This is my first recipe using Meyers (stay tuned for Meyer lemon curd crepe cake!), and I LOVE these lemons.  They are indeed a little sweeter and add the perfect lemon flavor.  I served these cupcakes with a dollop of whipped cream and some fresh blueberries, but they were also delicious just on their own.


Meyer Lemon Buttermilk Cupcakes
from Martha Stewart


3 cups all-purpose flour
1 tablespoon baking powder
1/2 teaspoon salt
1 cup (2 sticks) unsalted butter, room temperature
2 cups sugar
4 large eggs, room temperature
Finely grated zest of 3 Meyer lemons (about 3 tablespoons), plus 2 tablespoons fresh Meyer lemon juice
1 teaspoon pure vanilla extract
1 cup buttermilk

Preheat oven to 325 degrees. Line standard muffin tins with paper liners. Whisk together flour, baking powder, and salt.
With an electric mixer on medium-high speed, cream butter and sugar until pale and fluffy. Add eggs, one at a time, beating until each is until incorporated, scraping down sides of bowl as needed. Beat in zest and vanilla. Add flour mixture in three batches, alternating with two additions of buttermilk and lemon juice, and beating until just combined after each.
Divide batter evenly among lined cups, filling each three-quarters full. Bake, rotating tins halfway through, until golden brown and a cake tester inserted in centers comes out clean, about 25 minutes. Transfer tins to wire racks to cool completely before removing cupcakes. Cupcakes can be stored overnight at room temperature, or frozen up to 2 months, in airtight containers.

Whipped Cream
2 cups heavy cream
1/4 cup confectioners' sugar, sifted

Whisk heavy cream until soft peaks form.  Add sugar and whisk until combined.

Linked to:
Sweet Tooth Friday
Sweets for a Saturday 
Melt in Your Mouth Monday
A Themed Baker's Sunday 

Friday, April 22, 2011

Meringues

I love meringues.  They're sugary, light, and melt in  your mouth.  My son calls them clouds and was all excited when I made these, as was I!

Meringues are pretty easy to make, they just take a reaaallly long time.  Baking time varies, but all recipes require at least two hours in a low heat oven with the door cracked open.

I made these for my husband's insane birthday cake (recipe coming soon), and the recipe came out of Dessert University by Roland Mesnier.  Great book, but Roland doesn't spell a lot of stuff out for you, I guess he expects you to know certain baking basics, if not maybe you should head back to Dessert Elementary, if such a book exists.  Apparently I would need this book since half my meringues were crap.

Obviously if you're baking something with the oven door cracked open what is at the front of the oven is going to bake at a different rate than what is at the back, so you should rotate your pans every once in a while.  Yeah, didn't do that.  I baked them about 5 hours, and the ones at the front that I was testing were still quite soft.  I was super annoyed at the wasted time since I thought they were all garbage (I left these to the day of assembling the insane cake) but when I took the pans out the ones at the back were perfect.  So a lot of waste, but a lesson learned.  Thanks Roland,  you could have just told me in the first place.


Swiss Meringues
by Roland Mesnier

8 large egg whites
2 cups sugar

Preheat oven to 200 degrees F.  Position racks in the top and bottom thirds of the oven.  Line two baking sheets with parchment paper.
Combine the egg whites and the sugar in the stainless steel bowl of an electric mixer.  Pour enough water into the bottom of a large saucepan so that when the bowl is placed over it, the bottom of the bowl will come into contact with the water.  Heat, whisking constantly, until the egg whites are about 125 degrees F, or feel like warm soup to the touch.

Remove the bowl from the heat and beat the whites with an electric mixer on high until the meringue is cool and stiff.  Pipe the meringue into desired shapes on the baking sheets.  I used my large star tip that I usually use for piping frosting onto cupcakes.

Place baking sheets in the oven and leave the oven door cracked open about 1 inch (I stuck a wooden spoon the door).  Bake until completely dry, 2 to 3 hours, but this totally depends on how thick your meringues are.  Mine weren't that big and they took about 4 to 5 hours.  Also, you should periodically rotate the pans.  Since I didn't do this I don't really know how much, but I would say at least once after 2 hours.

Remove meringues from the oven and let them cool completely on the baking sheets.

Linked to:
Sweet Tooth Friday
Sweets for a Saturday 

Linked to:
Melt in Your Mouth Monday

Thursday, April 21, 2011

Seeded Wheat Bread

I love fresh baked bread, but after a bit of a bread baking disaster a while back I've shied away from making it from scratch.  Since my master baker mother was staying with me for a while I took full advantage of her mad yeast baking skills and got her to teach me all she knows.  We tried out Sarabeth Levine's house bread recipe, and it turned out great.  Mom showed me how to tell when to add more flour to the dough, and when the dough is ready.  She showed me how to knead it, and how to prepare it for than pan so it bakes up perfectly.   Thanks Mom!  You're the best!

I loved the flavors in this bread, it's nutty with a bit of honey.  My husband actually didn't really like it at all though, le sigh, there's just no pleasing some people, is there.  He said the honey added a "weird flavor" to it.  Whatever.

We modified the recipe slightly, taking out poppyseeds (didn't have any) and adding extra sunflower seeds.  We also didn't follow her technique exactly (the recipe has you let the dough proof in a plastic bag), my Mom has made enough loaves of bread to know what works and what doesn't.

Bread from scratch takes a little bit of work, especially recipes that aren't "no knead", but if you're into baking you'll likely find it fun and really satisfying to make a good loaf. 


Sarabeth's House Bread
adapted slightly from Sarabeth Levine


3 1/2 teaspoons active dry yeast
1/4 cup honey
2 1/4 cups cold water
2 3/4 cups whole wheat flour
2 3/4 cups bread flour, plus more as needed
2 tablespoons stone-ground yellow cornmeal
2 tablespoons sesame seeds
1 1/2 teaspoons fine sea salt
4 tablespoons hulled sunflower seeds
Softened unsalted butter, for the bowl and pans
1 large egg, beaten with a hand blender, for the glaze

Sprinkle the yeast over 1/4 cup warm water (about 110 degrees F) in a small bowl.  Let stand for 5 minutes to soften the yeast, then stir to dissolve.  Pour into the mixer bowl.  Add  2 cups cold water and the honey and whisk to combine.

Attach the bowl to the mixer and fit with the paddle attachment.  Combine the whole wheat flour, 2 1/4 cups of the bread flour, the cornmeal, sesame seeds, and salt in a large bowl.  With the mixer on low speed, add the flour and seed mixer.  Beat until a dough begins to form.  Gradually add enough of the remaining bread flour to form a rough dough that cleans the sides of the bowl.  Replace the paddle attachment with the dough hook.  Knead on med-low speed until the dough is smooth and slightly sticky, about 5 min, again adding a little more flour only if necessary - keep the dough soft.  During the last minute or so, add the sunflower seeds.

Transfer the dough to a clean work surface.  Knead with your hands to check the dough's texture.  It should be slightly sticky but not stick to the work surface.  Knead in more flour only if needed.  Butter a medium bowl.  Shape the dough into a taut ball.  Place in the bowl, turn to coat with butter, and turn smooth side up.  Cover tightly with plastic wrap.  Let stand in a warm place until the dough doubles in volume, about 1 1/4 hours.

Cut the dough in half.  Shape each piece into a ball.  Place on lightly flowered work surface and cover with plastic wrap.  Let stand for 15 minutes.  Butter two 8 by 4 by 2 1/2 -inch loaf pans.  Working with one ball of dough at a time, gently press to deflate the dough.  Pat the dough gently into a thick 8-inch-long rectangle.  Starting from the long side, roll and shape into an 8-inch-long loaf and pinch the long seam closed.  Place, seam side down, in the pan.  Cover the loaves with a clean lint-free tea towel and let rise until they dome about an inch above the tops of the pans, about 45 minutes.

Position a rack in the center of the oven and preheat to 375 degrees F.  Brush the tops lightly but thoroughly with the beaten egg.  Bake until the loaves are browned and the bottoms sound hollow when tapped, about 40 minutes.  Cool on a wire rack for 5 minutes.  Remove loaves from pans and cool completely on the rack.

Linked to:
Melt in Your Mouth Monday

Monday, April 11, 2011

Pink Vanilla Cupcakes

I made these for my little girl's recent 1st birthday party.  The cupcake is a yellow cake recipe from Nick Malgieri that I always use when making cupcakes for kids.  It's light and moist, super flavorful, and really easy to make.

The frosting is from Sweetapolita.  I love her blog, it's beautiful.  Her pictures are gorgeous and recipes are to die for.  This frosting for American style buttercream rules.  It is seriously the best frosting recipe I've tried.  It's light, fluffy, and perfect for piping.  I topped the cupcakes with some pearly pink nonpareils. 

These cupcakes turned out exactly how I had been picturing in my mind for the last few months since I decided to do a pink party for my sweet girly.  


Basic Yellow Cake
from Nick Malgieri

2 cups all-purpose flour
1 1/2 teaspoons baking powder
1/4 teaspoon salt
3 large eggs, at room temp
3/4 cup milk
12 tablespoons unsalted butter, softened
1 1/2 cups sugar
2 teaspoons vanilla extract


Set a rack at the middle level of the oven and preheat to 350 degrees.  Butter and line the bottom of two 9x2-inch round cake pans.

Whisk together flour, baking powder and salt. Set aside.  Whisk eggs and milk together, set aside.

In a large mixing bowl, beat butter and sugar for about 5 minutes, until light and fluffy.  Beat in vanilla extract.  Scrape down sides with rubber spatula.
On low speed add 1/4 of the flour mixture until it is absorbed.  Increase speed to medium low and beat in 1/3 of milk mixture.  Repeat this, including change of speed 2 more times. Scrape bowl and beat in remaining 1/4 of flour mixture.  Scrape again, increase speed to medium and continuously beat the batter for 3 minutes. Pour batter into prepared pan(s) and smooth top. Bake cake(s) about 20 to 35 minutes, or until a toothpick inserted in the center emerges clean. Cool in pan on a rack for 5 minutes, then turn out onto a rack, remove paper and let cool completely.

Sugary Birthday Buttercream Frosting
from Sweetapolita

1 cup (227 g) unsalted butter, softened
6 cups icing sugar (confectioners’)
120 ml whipping cream
2 tablespoons pure vanilla extract
1 tablespoon water
pinch of salt
Beat the butter and icing sugar in an electric mixer on low with the paddle attachment for about 2 minutes. Add the vanilla, water, whipping cream, and salt, and whip on high speed until fluffy and smooth–about 4 minutes. If consistency is too thick, add more water 1 teaspoon at a time, then whip again for 30 seconds or so.
Makes enough to fill & frost a 3-layer, 8″ cake.

Linked to:
Melt in Your Mouth Monday
Muffin Monday 
Sweet Tooth Friday
Sweets for a Saturday 

Wednesday, April 6, 2011

Ellis' Pretty and Pink 1st Birthday Party

I recently posted about my darling baby girl Ellis' 1st birthday and her first taste of cupcakes.  That weekend we had a bigger birthday party for her complete with a cake smash, and I was lucky to have my dear friend Jamie from Jamie Lacey Photography there to capture the whole event.

Everything was in pink.  Pink drinks, pink cupcakes, pink party favors, pink napkins, pink balloons, pink everything.  For all I know Ellis is going to grow up to hate pink, but for now Mommy gets to choose the party themes.

Ellis doesn't really have any friends her own age but her older brother Liam's friends just love her.  The kids all talk about her and ask if she'll be at playdates.  So they all came to help us celebrate our gorgeous, hilarious, sweet little Ellis' first birthday.

This was my first attempt at making a banner, and I'm super happy with the way it turned out!

Photo by Jamie Lacey Photography


The cupcakes were pink of course, I also made some cupcake toppers

Photo by Jamie Lacey Photography


You can never have too many pink desserts so I made strawberry coconut Lamingtons and sugar cookies

Photo by Jamie Lacey Photography


Photo by Jamie Lacey Photography


Pink M&Ms and coneflower kits were favors for the kids

Photo by Jamie Lacey Photography


Ellis' cake was almost too pretty to let her smash.  Almost

Photo by Jamie Lacey Photography


And the birthday girl had her beatuiful pink cake all to herself

Photo by Jamie Lacey Photography

Tuesday, April 5, 2011

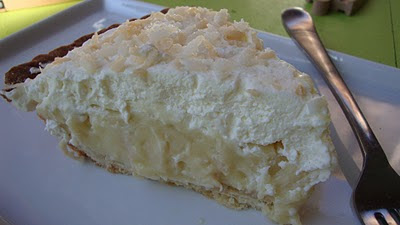
Toasted Coconut Cream Pie

This pie is dreamy.  Cream pies, or icebox pies as I've learned they're also called, are one of the best desserts ever.  A sugary crispy crust, combined with luscious creamy filling, and often topped with whipped cream.  Hello!

This is my first recipe out of my new Flour cookbook, and I hope every recipe is as delightful and amazing as this one.  I love this book since she includes the weights in addition to measurements.  I am easily distracted and often lose count of ingredients, cups of flour for instance, so it's nice to bake with weights.  You can't go wrong!

The only thing that didn't work out was the lime whipped cream.  The added cornstarch was kind of gross.  It added a gritty texture and tasted like cornstarch which is not terribly appealing.  The whipped cream ended up kind of lumpy, I must have done something wrong but no idea what.   I ditched it and just whipped some up fresh with a little bit of rum extract.  Yum!  I would also probably use more toasted coconut next time, there was plenty in the filling but the topping was a bit sparse.


Toasted Coconut Cream Pie
Slightly adapted from Flour 

Makes one 9-inch pie to serve eight
1 pate sucree shell (see below)
1 can (14 ounces; 392 grams) unsweetened coconut milk
½ cup (120 grams) milk
2/3 cup (140 grams) sugar
1/3 cup (40 grams) cake flour
1 egg
4 egg yolks
¼ teaspoon vanilla
½ teaspoon salt
1 1/4 cup (100 grams) lightly toasted coconut, divided
1 ¼ cups heavy cream
1/2 teaspoon rum extract
3 tablespoons confectioners sugar

Pate Sucree
Makes enough for one 9-inch pie shell

8 tablespoons (1 stick; 112 grams) unsalted butter
¼ cup (50 grams) sugar
½ teaspoon salt
1 cup (144 grams) all purpose flour
1 egg yolk

In a stand mixer with a paddle attachment cream the butter, sugar and salt for 2-3 minutes until pale and light.  Be sure to scrape down the sides and bottom of the bowl with a rubber spatula.  Add flour and paddle on low speed for about 30 seconds until flour mixes in with the butter/sugar mix.  It will look like wet sand.  Add the yolk to the dough with the mixer on low speed and mix until the dough comes together, about 30 seconds.  Remove dough from bowl and wrap tightly in plastic wrap and let rest in the refrigerator for about an hour.  (Dough may be made ahead at this point and stored in freezer tightly wrapped for up to 2 weeks or in the fridge for up to 5 days.  If frozen, defrost dough in fridge overnight before using.)
Remove from fridge and knead the dough slightly to make it malleable if it feels stiff. Using a rolling pin, press the dough to flatten it into disk about ½ inch thick.  Generously flour your work surface and the dough disk and carefully roll out the disk into a circle about 10-11 inches in diameter.  Make sure the table you are rolling on is well floured so that the dough does not stick to it; likewise make sure the disk itself is floured well enough to keep your rolling pin from sticking to it.  Roll from the center of the disk outward and gently rotate the disk a quarter turn after each roll to ensure that the disk gets stretched out evenly into a nice circle.  Don’t worry if the dough breaks a bit, especially towards the edges.  You can easily patch these tears up once you’ve lined your shell.
Once the dough circle is about 10-11 inches in diameter, roll it around the pin and then unfurl it on top of the pie pan.  Press the dough to the bottom and sides of the pie pan and use any scraps or odd pieces to patch up any tears or missing bits.  Make sure that the entire pie shell is well covered with dough and press one last time all the way around to ensure that any holes have been patched up.  Trim the edge of the shell to make it even with the pie plate.

Preheat oven to 350 degrees.  
Place pie shell in fridge for at least 30 minutes (and up to a day well wrapped or up to 2 weeks in the freezer well wrapped) to rest the dough.  Bake pie shell as is in oven for 35 minutes until the shell is golden brown all around.  Cool completely before filling.


Pie Filling
 In a medium saucepan combine coconut milk and milk and heat until it just comes to a boil.  Combine sugar and flour in a small bowl and whisk to combine (combining sugar and flour together keeps the flour from clumping up when you whisk it into the eggs.)  Whisk together egg and egg yolks in medium bowl and slowly whisk in sugar/flour.  Using a small ladle, ladle in a little of the hot milk mixture into the egg/sugar mixture and whisk it in; continue adding the hot milk to the egg/sugar until it is all combined. 
Pour mixture back into the saucepan and place on stove over medium heat.  Whisk vigorously and continuously for 4-5 minutes until mixture thickens and comes to a boil. Make sure you get your whisk into the corners of the saucepan and make sure you are scraping the bottom at all times.  First the mixture will be thin and frothy; as it gets hotter and the eggs start to cook it will get thicker and start to steam.  Eventually it will start to boil – but because you will be whisking continuously and because the mixture will be so thick it will be hard for you to know when it’s boiling.  Stop whisking for a few seconds once the mixture becomes thick and watch the surface of the custard to see if it starts to blub up.  It will go blub blub and that’s when you know it’s come to a boil.  Once the custard has come to a boil, whisk even more vigorously for 30 seconds.  Immediately take the custard off of the stove and pour it through a fine strainer into a pitcher.  Whisk in vanilla, salt, and ¾ cup toasted coconut.  Pour filling into pie shell and refrigerate until filling is set, at least four hours.

Using a stand mixer with a whisk attachment, whip cream with confectioners sugar until it holds firm peaks.  Beat in the rum extract.  Pile the whipped cream filling directly on top of the coconut filling, spreading the whipped cream out to the edge of the pie.  Decorate the pie with 1/2 cup toasted coconut.
Pie may be served immediately or stored in an airtight container for up to two days before serving.

Linked to:
Sweet Tooth Friday
Sweets for a Saturday
Melt in Your Mouth Monday

Friday, April 1, 2011

Buttermilk Sour Cream Doughnuts

I have been craving doughnuts for weeks, but I can't find a good doughnut shop where I live.  They all have that greasy taste, you know like when they've been using the same oil for months.  I've wanted to try making my own but I'm really nervous around hot oil, I don't think I've literally ever fried anything, and I like fried things.  Luckily my Mom is in town, so she took over frying duties and I was able to keep a safe distance.

These doughnuts are delightful.  Super crispy on the outside and soft and pillowy on the inside.  They're not too sweet, and the cinnamon and nutmeg add a delicious flavor.  The chocolate topping is glorious, not sweet but intensely chocolate.  I don't know that I would make these too often since we got about 15 large doughnuts out of the recipe plus the doughnut holes which is a lot of doughnuts to eat, even for four doughnut lovers.  But if you've got a hungry crew who likes doughnuts, this is a great recipe to try!


Farm Stand Buttermilk Doughnuts
from Baked Explorations

The Doughnuts

3 1/2 cups all purpose flour
3/4 cup granulated sugar
1/2-teaspoon baking soda
2 teaspoons baking power
1-teaspoon salt
1 teaspoon freshly grated nutmeg
1-teaspoon cinnamon
2 large eggs
3/4-cup buttermilk
1/4-cup sour cream
1/4 cup (1/2 stick) unsalted butter, melted and slightly browned and cooled
Vegetable oil for frying

Chocolate Dip

4 ounces good-quality dark chocolate (60-70%), coarsely chopped
1/2-cup heavy cream
2 tablespoons unsalted butter
Sprinkles to decorate


Make the Doughnuts

Line one baking sheet with parchment paper and another baking sheet with two layers on paper towels.

In a large bowl, whisk together the flour, sugar, baking soda, baking powder, salt, nutmeg, and cinnamon.

In a medium bowl, whisk the eggs, buttermilk, and sour cream until combined. Add the melted, cooled butter and whisk again.

Make a well in the center of the flour mixture and pour the liquid ingredients into the well. With a rubber spatula, slowly fold the flour into the liquid center until the mixture form a sticky dough.

Turn the dough out onto a work surface slightly dusted with flour. Sprinkle the top of the dough with flour and pat it out until it is about 1/2 inch thick.

Use two round cutters (3 1/2 inch and 1 1/2 inch for large doughnuts; 2 1/2 inch and 1 inch for smaller doughnuts). Dip the large cutter in flour and press out the rounds.

Dip the smaller cutter in the flour and cut out the center of ach dough round. Arrange both doughnuts and doughnut holes on the parchment-lined baking sheet, pat the dough scraps back together, and use them to make as many more doughnuts and doughnut holes as possible. Chill the dough while you heat the oil.

Pour enough oil into a deep skillet to make layer approximately 1 inch to 1 1/2 inches deep. Slowly heat the oil over medium-high heat until it id 365 to 370 degrees F.

While you are waiting for the oil to reach temperature, make the toppings.

Make the Chocolate Dip

Place the chopped chocolate in a medium wide-mouthed bowl. In a small saucepan, heat the cream until it is about to boil. Pour the cream over the chocolate ad wait a minute. Whisk until smooth. Whisk in the butter. Keep the mixture warm.

Fry the Doughnuts

Once the oil reaches temperature, gently lift the large doughnuts off the baking sheet and place them in the hot oil. Do not crowd the skillet – make no more than 3 doughnuts at a time. Once they have browned on one side (this takes 2-3 minutes), turn them over with tongs or a slotted spoon and continue to cook for another minute or just until browned (they can overcook or burn rather quickly). Using a slotted spoon, transfer the doughnuts to the paper towel- lined baking sheet and continue o fry the rest of the dough until finished. The doughnut holes will cook faster and can be made in two or three batches after the doughnuts are done.

Assemble the Doughnuts

Once you have finished frying, work quickly to dip the doughnuts in the chocolate with sprinkles. Serve immediately.

Linked to:
Sweet Tooth Friday
Sweets for a Saturday 
Melt in Your Mouth Monday
Related Posts Plugin for WordPress, Blogger...